OpenOCD is a great tool. It allows debugging many modern ARM-based microcontrollers using multitudes of JTAG/SWD programmers: from the $50 FlySwatter to the $800 J-Link Pro. It allows customizing lots of settings and it’s open-source so if you encounter some problems with it, you can quickly pinpoint them by stepping through its code. Despite all those strong sides, it has one major drawback – it’s not easy to setup.
A typical OpenOCD debugging setup involves finding the correct initialization scripts, customizing them to match your device/interface and often manually preparing and installing USB drivers. Although generally doable, this looks like a major inconvenience for anyone who expects a “plug-and-play” experience.
VisualGDB has been supporting OpenOCD since version 4.0 by providing a simple dialog summarizing most commonly used settings on one page: Although it had all necessary options at hand, it has still been a major source of confusion. E.g. if you are debugging your STM32F4Discovery, you may think that stm32f4x.cfg is the right script to use. However if you use it, you’ll get a cryptic error message because it is not suited for ‘High-level Adapters’ like ST-Link, so you need to use the stm32f4x_stlink.cfg file. Things get worse: some adapters require setting JTAG speed, some don’t, some will complain about an unsupported command, so you eventually end up hacking your scripts in hope of getting it to work on a trial-and-error basis.
Thankfully, not anymore. We’ve just rolled out an update to our OpenOCD package that takes care of all routine for you. The interface is very simple: just select a programming interface you want to use: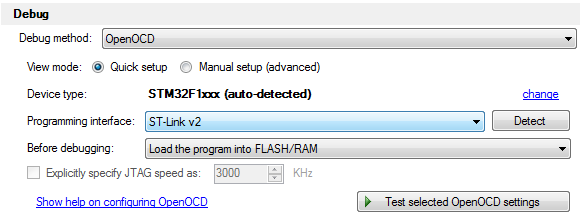 And if you’re not sure, just hit “Detect”. As OpenOCD scripts already contain USB VID/PIDs for the USB programmers, our OpenOCD package can use them to detect which one fits your device.
Driver installation is not a problem either. When you test the OpenOCD settings, our package can check if a correct driver is installed and install it automatically in case it’s missing: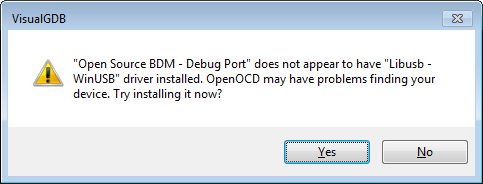 The package is using a basic and scalable format to define supported programming interfaces and devices and map them to OpenOCD scripts. Here’s a snippet from interfaces.xml describing the Olimex ARM-USB-OCD-H interface:
    <ProgrammingInterface>
        <ID>olimex-arm-usb-ocd-h</ID>
        <Name>Olimex ARM-USB-OCD-H</Name>
        <ScriptFile>interface/olimex-arm-usb-ocd-h.cfg</ScriptFile>
        <UsbIdentities>
            <UsbIdentity>
                <VID>15ba</VID>
                <PID>002b</PID>
                <Interface>00</Interface>
            </UsbIdentity>
        </UsbIdentities>
        <UniversalDriverId>com.sysprogs.ftdi</UniversalDriverId>
    </ProgrammingInterface>
And here’s another one from devices.xml describing a subset of Freescale Kinetis devices:
    <TargetDeviceFamily>
        <ID>kinetis_256k</ID>
        <Name>Freescale Kinetis (256KB FLASH)</Name>
        <MatchRegex>^(M|P)KL?[0-9]+[A-Z]+256.*</MatchRegex>
        <BspID>com.sysprogs.arm.freescale.kinetis</BspID>
        <ScriptFile>target/kinetis_256k.cfg</ScriptFile>
    </TargetDeviceFamily>
Those files provide enough information for our package to select necessary OpenOCD scripts having just the device name and the interface name. So with all the setup routine taken care of you can fully concentrate on the actual debugging. Enjoy it!