Debugging Linux Kernel Modules on STM32MP1 Devices
This tutorial shows how to build and debug a basic kernel module on the STM32MP1 device running the OpenSTLinux distribution with Visual Studio and VisualKernel. Before you begin, follow this tutorial to build an SDK and the SD card images for your STM32MP1 board using the OpenSTLinux build system. Once the build is complete, take a note of the following paths:
- The path where you have installed the SDK (by running the .sh file generated by the populate_sdk target) and the full path to its environment setup file (e.g. /opt/st/stm32mp1/2.6-snapshot/environment-setup-cortexa7t2hf-neon-vfpv4-openstlinux_weston-linux-gnueabi).
- The full path of the Linux kernel built by the OpenSTLinux scripts. You can find it by searching for ‘vmlinux’ inside the build subdirectory of your OpenSTLinux checkout. If you followed our SDK building tutorial, it will be located in /opt/stlinux-weston/build-openstlinuxweston-stm32mp1/tmp-glibc/work/stm32mp1-openstlinux_weston-linux-gnueabi/linux-stm32mp/4.19-r0/linux-stm32mp1-standard-build/vmlinux.
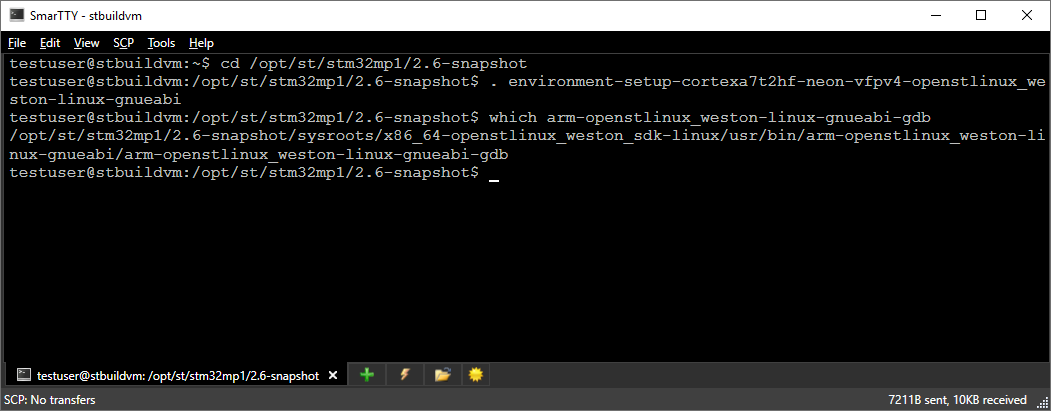
- The full path of the gdb binary included in the OpenSTLinux SDK. You can find it out by applying the environment file from the SDK and then running the “which arm-openstlinux_weston-linux-gnueabi-gdb” command in the same terminal:
Then ensure you have VisualKernel 3.1 or later installed and follow the steps below to create, build and debug a simple kernel module project.
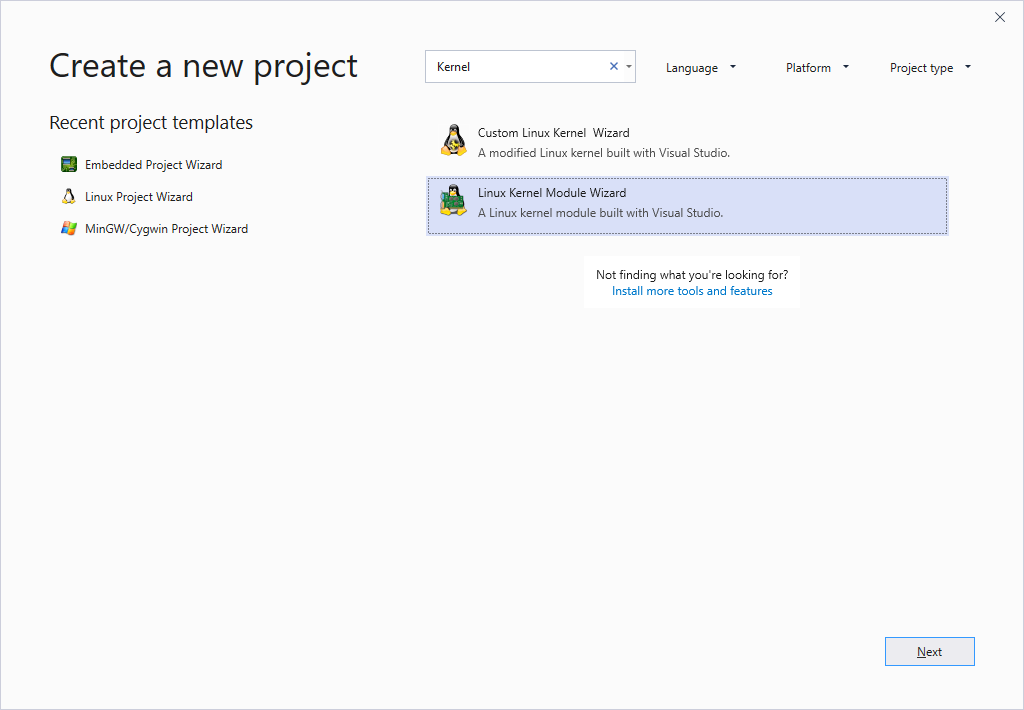
- Start Visual Studio and open the VisualKernel Project Wizard:
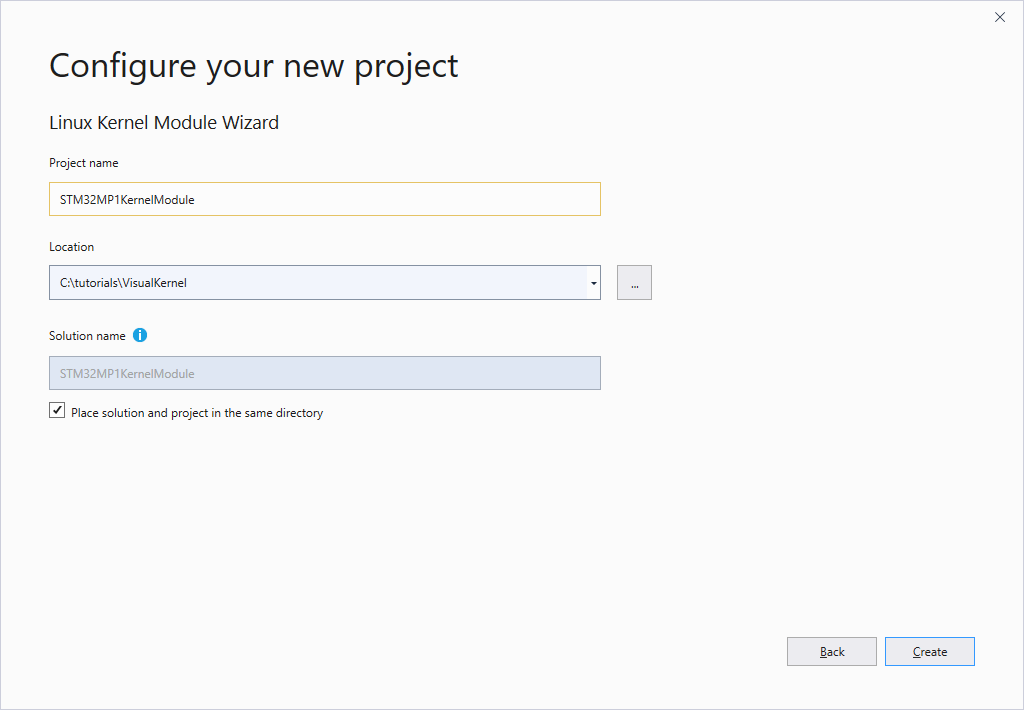
- Enter the name and the location of the kernel module that will be created by VisualKernel:
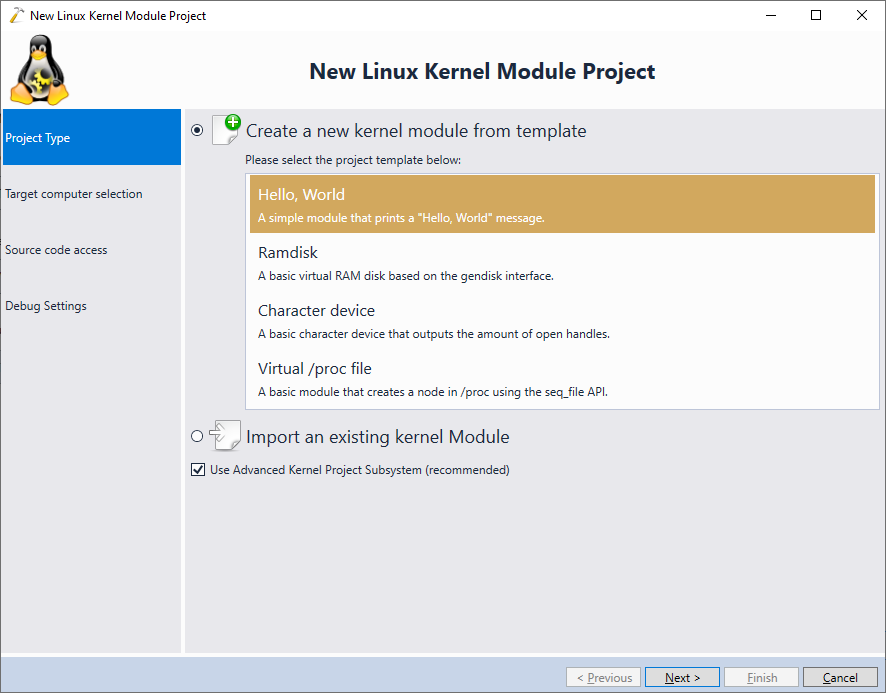
- On the first page of the VisualKernel project wizard proceed with creating the default “Hello, World” example”
- On the next page specify the following settings:
Setting Value Example Targeted Linux computer Your STM32MP1 board root@stm32mp1 Build the module on The Linux machine containing the OpenSTLinux build testuser@stbuildvm Compatible GDB binary Select Manually => Full path to the GDB binary from the SDK /opt/st/stm32mp1/2.6-snapshot/sysroots/x86_64-openstlinux_weston_sdk-linux/usr/bin/arm-openstlinux_weston-linux-gnueabi/arm-openstlinux_weston-linux-gnueabi-gdb Kernel Build Environment Configure Manually 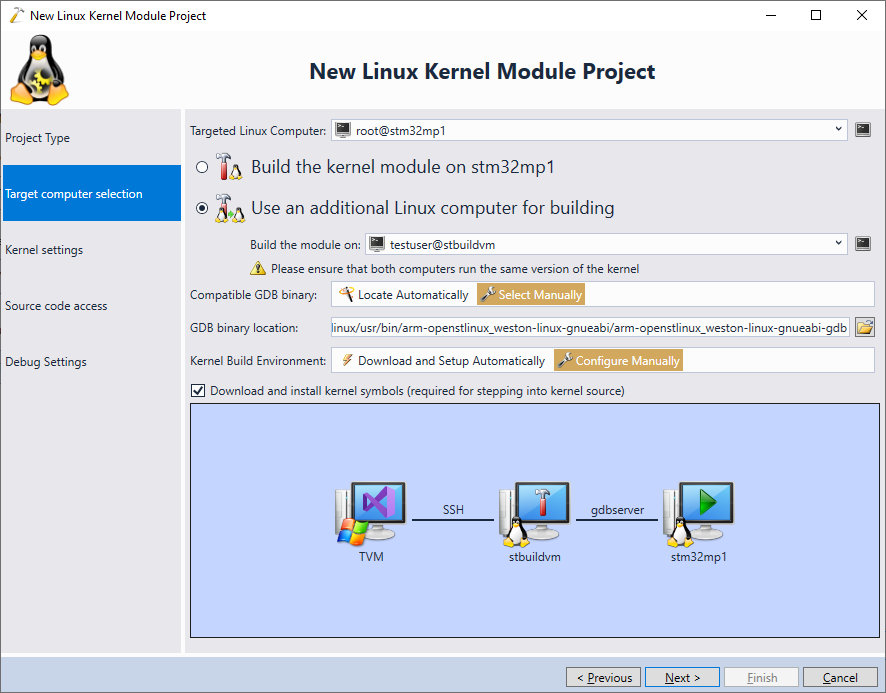
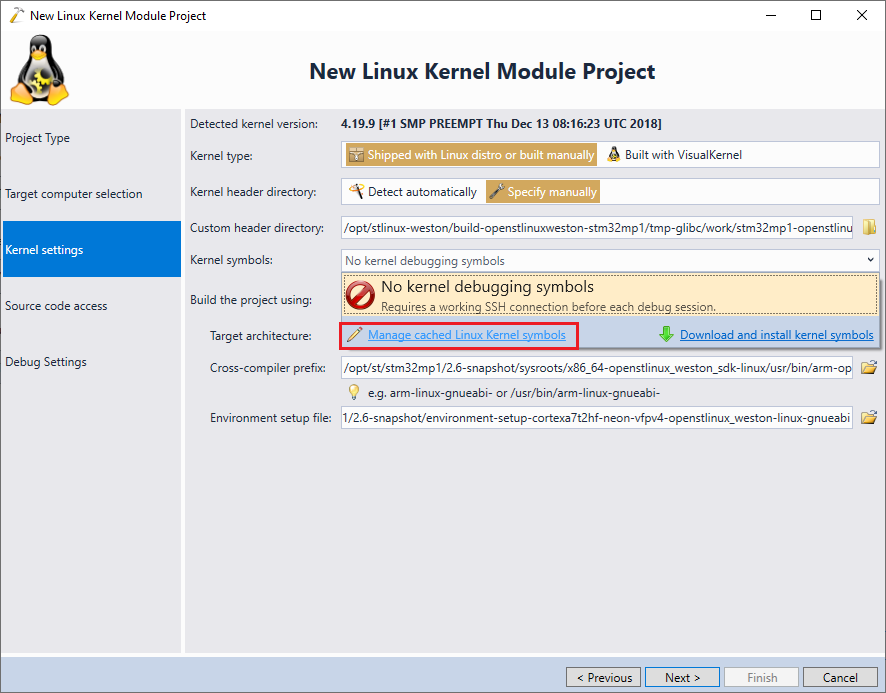
- On the next page you will need to enter the location of the kernel headers (that should be the kernel build directory since OpenSTLinux doesn’t have a separate header directory) and the cross-compiler parameters so that VisualKernel can configure the build tools. Enter the following settings:
Setting Value Example Kernel Header Directory Kernel build directory inside the OpenSTLinux checkout /opt/stlinux-weston/build-openstlinuxweston-stm32mp1/tmp-glibc/work/stm32mp1-openstlinux_weston-linux-gnueabi/linux-stm32mp/4.19-r0/linux-stm32mp1-standard-build Build the project using Custom cross-compiler Target architecture arm Cross-compiler prefix Full path to the gdb executable inside the OpenSTLinux SDK except the last 3 characters /opt/st/stm32mp1/2.6-snapshot/sysroots/x86_64-openstlinux_weston_sdk-linux/usr/bin/arm-openstlinux_weston-linux-gnueabi/arm-openstlinux_weston-linux-gnueabi- Environment setup file The environment setup file inside the SDK /opt/st/stm32mp1/2.6-snapshot/environment-setup-cortexa7t2hf-neon-vfpv4-openstlinux_weston-linux-gnueabi 
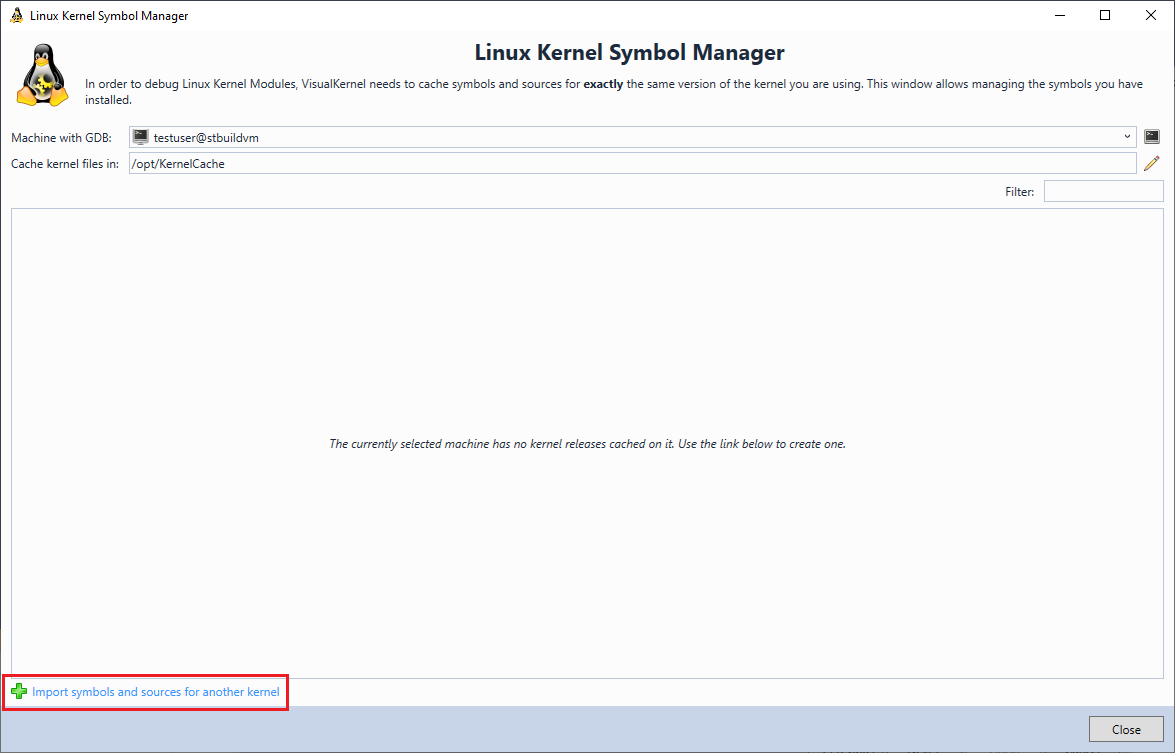
- Now we will import the kernel debugging symbols for the built kernel into VisualKernel. Open the “Kernel symbols” dropdown and click “Manage cached Linux Kernel Symbols”:
 o
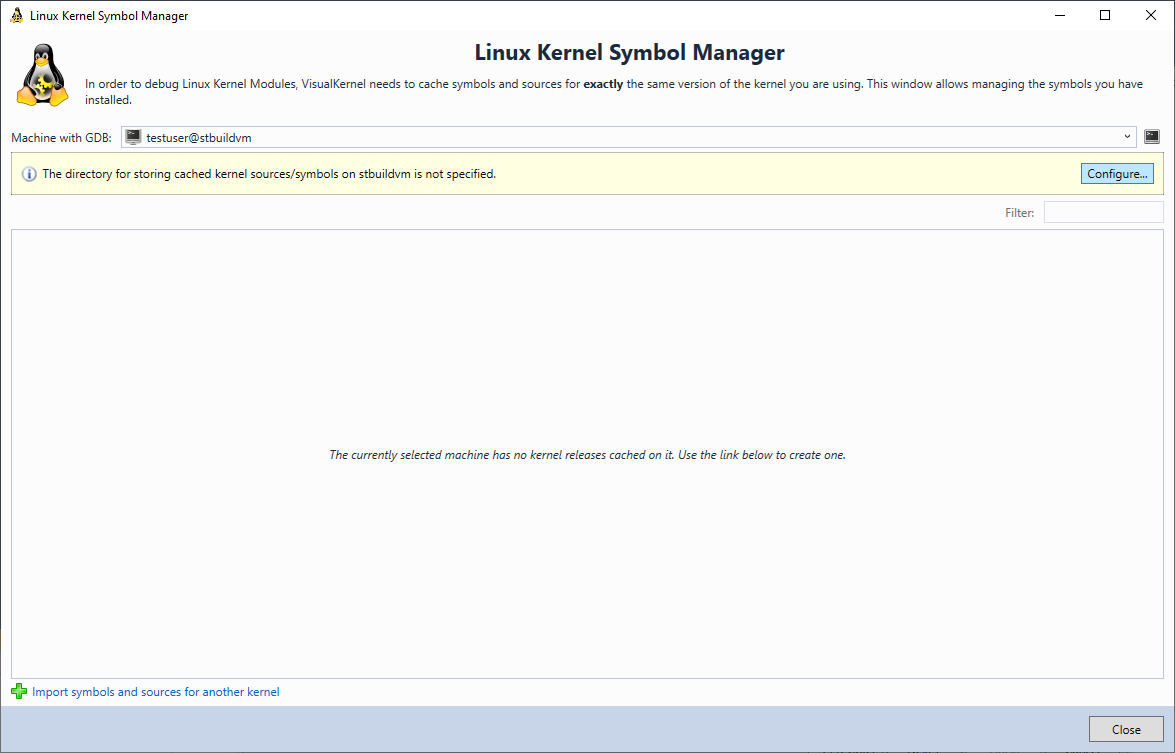
o - If you have not configured any kernel symbols on the machine used to build OpenSTLinux yet, click “Configure” to choose a directory where VisualKernel will cache various kernel parameters:
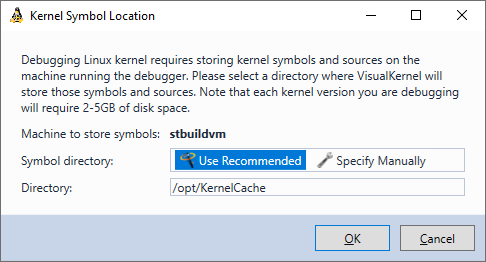
- We recommend proceeding with the default /opt/KernelCache directory:
- Click “Import symbols and sources for another kernel” to start importing the kernel symbols into VisualKernel:
- On the first page of the kernel import wizard select “Link to an existing kernel build”:

- On the second page specify the following settings:
Setting Value Example Kernel file with symbols Full path to the vmlinux file built by the OpenSTLinux scripts /opt/stlinux-weston/build-openstlinuxweston-stm32mp1/tmp-glibc/work/stm32mp1-openstlinux_weston-linux-gnueabi/linux-stm32mp/4.19-r0/linux-stm32mp1-standard-build/vmlinux Source directory The directory with the kernel sources (containing the KConfig file and .c files in subdirectories) /opt/stlinux-weston/build-openstlinuxweston-stm32mp1/tmp-glibc/work/stm32mp1-openstlinux_weston-linux-gnueabi/linux-stm32mp/4.19-r0/linux-4.19.9 Custom GDB binary GDB binary from the built SDK /opt/st/stm32mp1/2.6-snapshot/sysroots/x86_64-openstlinux_weston_sdk-linux/usr/bin/arm-openstlinux_weston-linux-gnueabi/arm-openstlinux_weston-linux-gnueabi-gdb Target architecture arm Cross-compiler prefix GDB binary path without the last 3 characters /opt/st/stm32mp1/2.6-snapshot/sysroots/x86_64-openstlinux_weston_sdk-linux/usr/bin/arm-openstlinux_weston-linux-gnueabi/arm-openstlinux_weston-linux-gnueabi- Environment setup file Environment setup file from the SDK /opt/st/stm32mp1/2.6-snapshot/environment-setup-cortexa7t2hf-neon-vfpv4-openstlinux_weston-linux-gnueabi 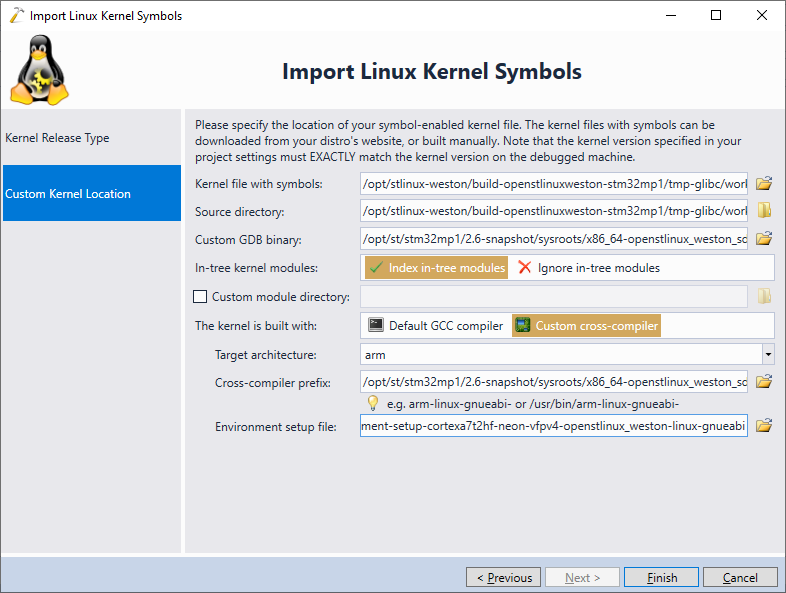
- VisualKernel will begin indexing the kernel sources and symbols. Once this process completes, the results will be saved in the kernel cache directory so that they can be easily reused for further projects:

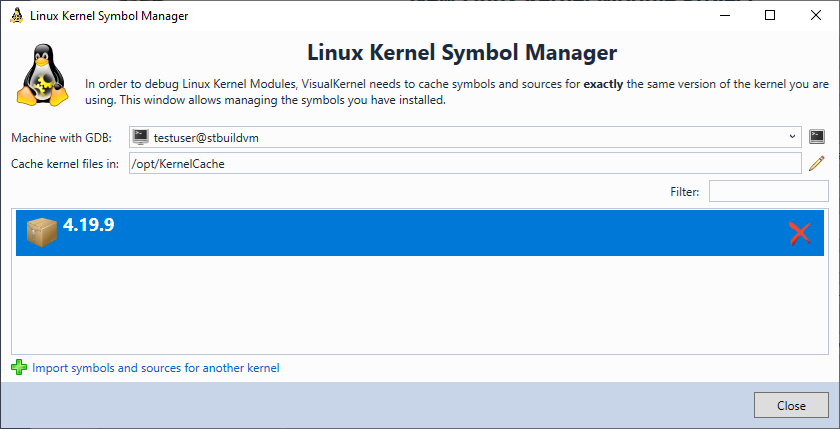
- Verify that the newly imported kernel appears in the Linux Kernel Symbol Manager window and click “Close” to get back to the kernel module project wizard:
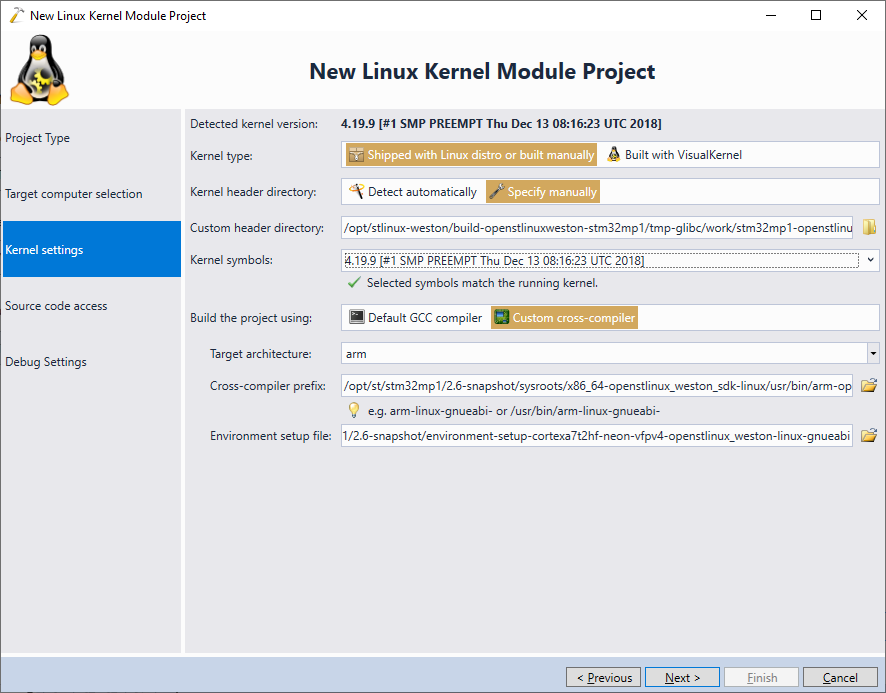
- Select the imported symbols in the “Kernel Symbols” field and ensure VisualKernel confirms that they match the currently running kernel:
- The next page of the wizard allows choosing between keeping the source files on Windows (and uploading them on each build) or keeping them on the machine with the OpenSTLinux SDK and accessing them via SSH. In this tutorial we will show the second option:

- Finally, the Debug Settings page of the wizard allows specifying the method that VisualKernel will use to debug the target. Most of the popular boards and devices are supported by the mainline OpenOCD and hence can be simply selected via the “Debug embedded board via JTAG” option, however as of July 2019, STM32MP1 boards require a special fork of OpenOCD that needs to be downloaded and launched explicitly. Get the latest STM32MP1 OpenOCD release from our Github page, unpack it and specify the following settings on the Debug Settings page:
Setting Value Example Connect to Host/Port Host [Host name or IP address of the Windows machine]:3334 TVM:3334 Command Full path to OpenOCD C:\OpenOCD-STM32MP1\bin\openocd.exe Arguments -c “bindto 0.0.0.0” -f interface/stlink-dap.cfg -f target/stm32mp15x.cfg 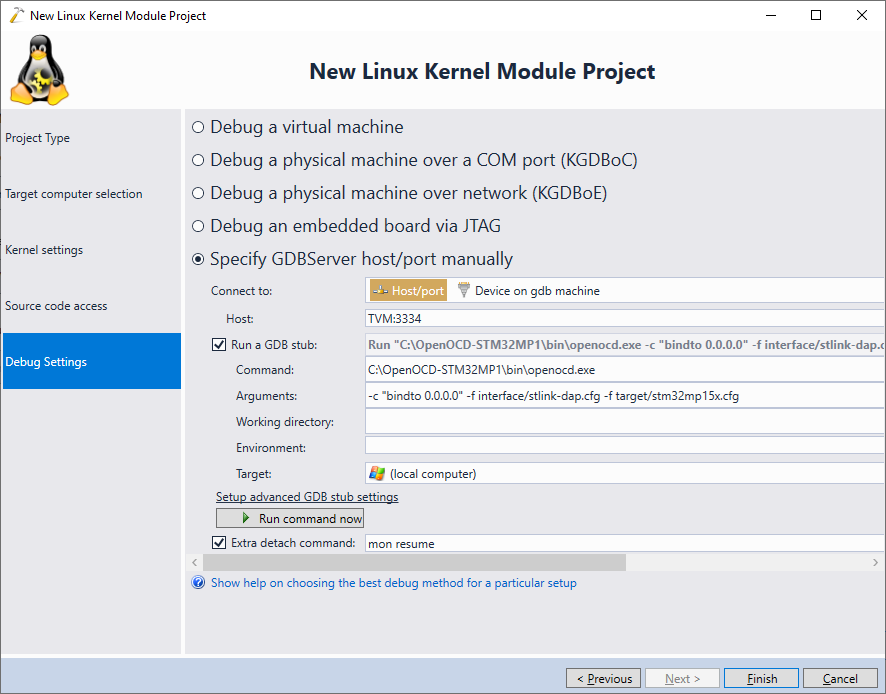
Note that OpenOCD will listen for GDB on 2 ports: 3333 for debugging the Cortex-M4 core and 3334 for debugging the Cortex-A7 core running Linux. Also ensure that your firewall allows connecting to OpenOCD running on the Windows machine from the Linux build machine and that the Linux machine can find the Windows machine using its host name (unless you are specifying an IP address instead).
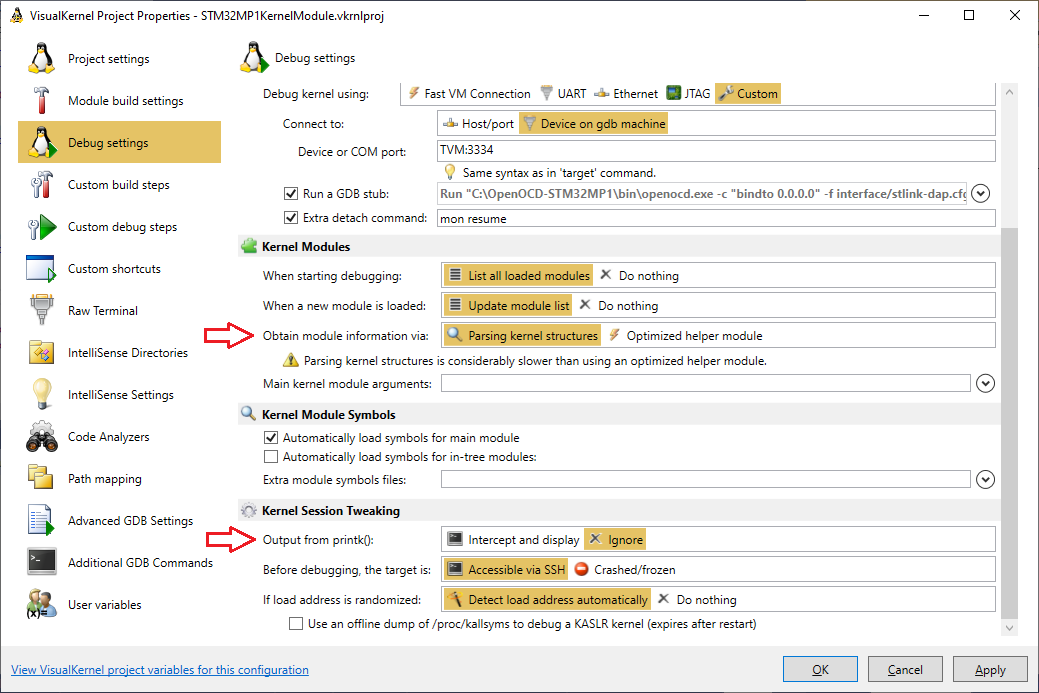
- Press “Finish” to create the project. Once it is created, open VisualKernel Project Properties and go to the Debug Settings page. Then change 2 settings:
- Because the default STM32MP1 kernel is built without tracing support, VisualKernel’s module that allows tracing loading/unloading of other modules without parsing the full kernel symbols won’t work out-of-the-box. Hence select Obtain module information via: Parsing kernel structures.
- Reading the target memory via JTAG involves many separate low-level operations, hence capturing the printk() output would take considerable time (several seconds per line). Hence we recommend disabling it to avoid long wait if the kernel produces verbose debugging output via printk().
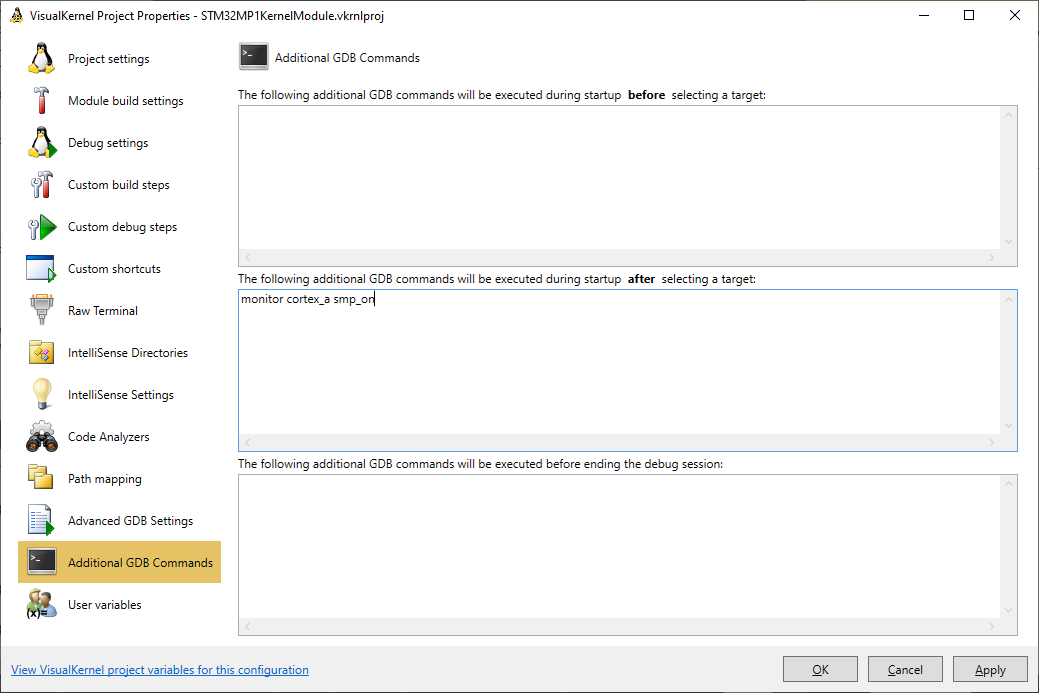
- Finally, we recommend adding “monitor cortex_a smp_on” command via Additional GDB Commands => after selecting a target. It will show the multiple Cortex-A7 cores as separate threads in the Threads window:
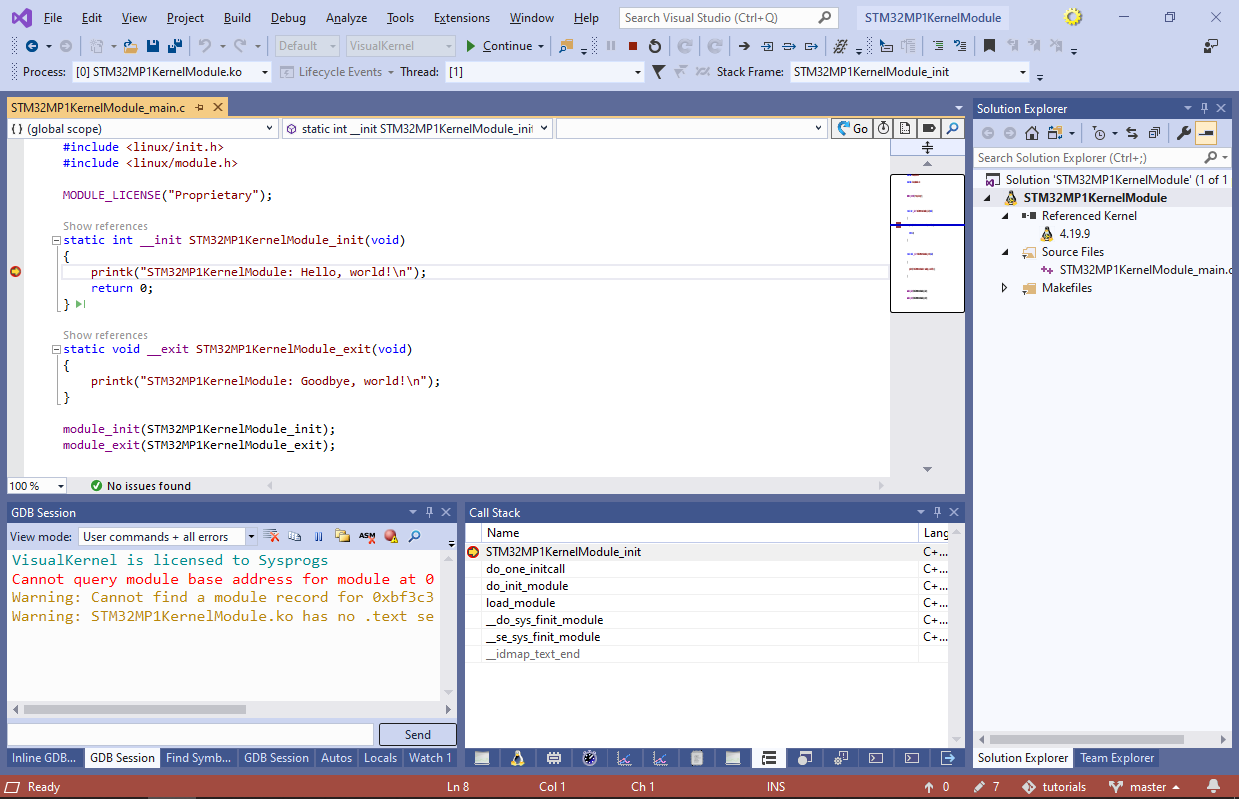
- Set a breakpoint in the init() function and press F5 to build the module and start debugging it. Note that due to the OpenSTLinux symbol layout, VisualKernel may report an incompatible kernel version when you start debugging. If this happens, simply press “Yes” to continue debugging:
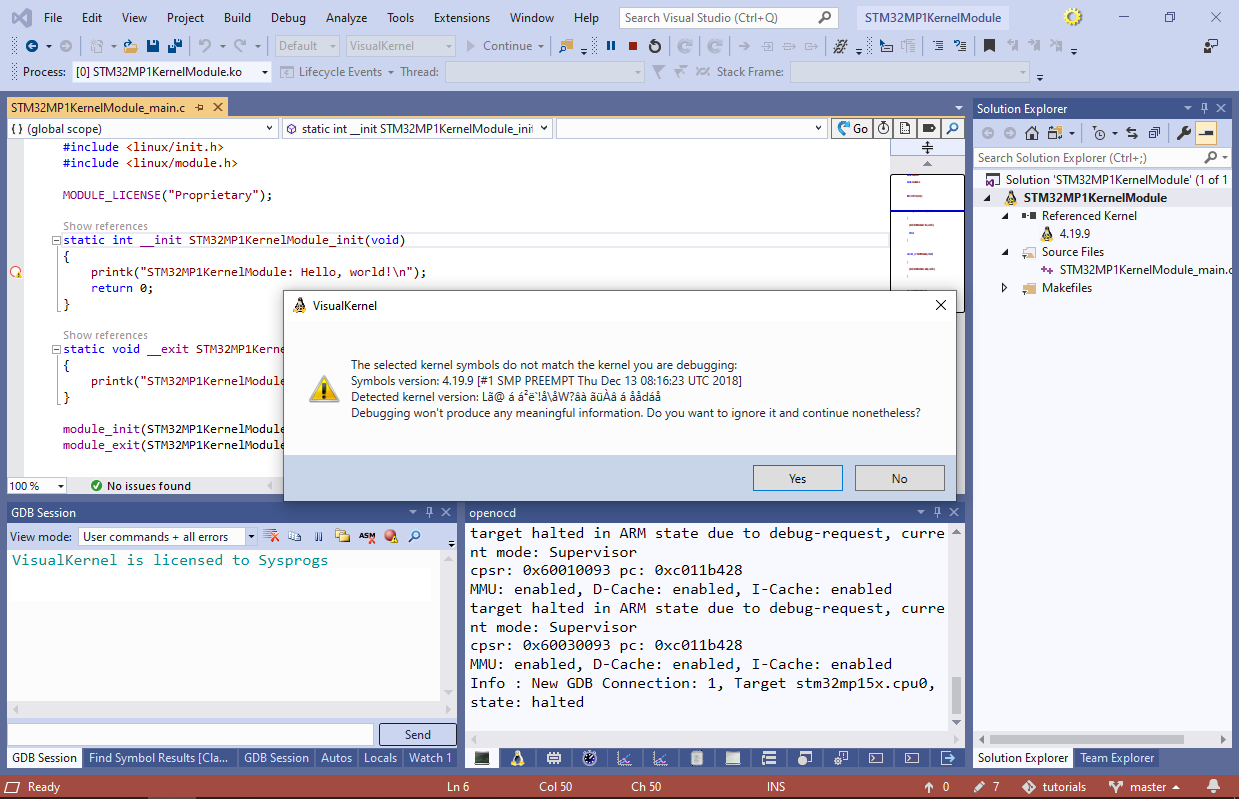
- VisualKernel will automatically load the kernel module and the breakpoint in the init() function will trigger:
- You can step into the printk() function by pressing F11. VisualKernel will automatically locate the relevant sources:
